Lightroom CC Performance – Insights on the 5K Retina iMac
![]()
Lightroom CC and the standalone Lightroom 6 finally launched last week. As a professional wedding photographer, I’ve been interested in Lightroom’s performance for a long time and I’ve been investigating and writing articles about it myself since early last year. Earlier articles, such as my piece on Lightroom and the New Mac Pro, and my thoughts on the 5K Retina iMac I bought last October, have been some of the most popular pages on my entire website.
Before I purchased the 5K iMac I was concerned that in Lightroom the performance of the Develop Module might suffer as the hardware had to drive such a massive (5120×2880) display. As my early write-up found, these fears were largely unfounded. However, as I began to use the machine more and more, I encountered a collection of niggles that manifested themselves specifically in the interaction between Lightroom and the 5K iMac. I didn’t have much in the way of LR issues before the 5K iMac and, aside from these Lightroom specific niggles, I cannot fault the iMac 5K. They weren’t deal breakers, but taken as a whole they were detrimental to my workflow and collectively became somewhat annoying. The main issues under Lightroom 5.6 on the 5K iMac were:
- Crop Tool – Took forever to begin and end the crop process. This varied, but it was far slower than it should have been. As a much-used tool this was frustrating.
- Slideshow Module – Slideshows at 5K simply didn’t work. They stuttered along in a fashion that was simply too jerky to be of use.
- Soft Proofing – Making adjustments in soft proofing was so slow that it became almost impossible to see the alterations that had been made.
Needless to say, my hope was that the next Lightroom release would address these issues. Lightroom CC performance was my most desired ‘feature’.
A word on software updates and what can and can’t be achieved. Many people said that Lightroom performance would never increase dramatically because Adobe was limited by what functions could be offloaded to the GPU. Commentators all over the internet said that it simply “wasn’t possible” to effectively harness the GPU for much of Lightroom’s bread and butter work. My view was that increased performance absolutely could be achieved and that Adobe simply needed the incentive – in the form of computers that required it – to write intelligent code that would best harness the processing power of the entire system – that’s to say the CPU and GPU. Despite protestations to the contrary from some sectors, Lightroom CC/6 has arrived and brings with it considerable GPU leveraging which, in short, makes it a far better fit for a high resolution machine like the 5K iMac. We live in a world that is hell bent on extending ever-shortening upgrade cycles to as many facets of life as possible. Our phones, cameras, cars, televisions, sports equipment, lighting, broadband, wireless, software, etc etc ad nauseam is all built with the intention of being upgraded as soon as the manufacturer can convince us we need to. In this regard I’m as bad, if not worse, than most in succumbing to this temptation. I love technology and I’m a believer in striving to continually improve. While it’s not the source of any meaningful happiness and it’s nihilistically consumerist at times, the permanent upgrade cycle is also in some ways, fun. We’re all a little guilty of gear lust. However, given this, I am staggered when people think that an upgrade, such as GPU acceleration in Lightroom is some sort of technical implausibility. Here’s the rub. They can do it, they’re just going to wait till they can charge you for the privilege. Anyway, enough ‘told you so’. Let’s discuss the upgrade.
In short, Lightroom CC* is a subtle leap forward. It’s not as feature filled as some of the earlier releases but it hones the app in a way that reminds me of the OS X Leopard-to-Snow Leopard update. Speed and intelligent improvements to the underlying code are front and centre. It may not look that different but, under the hood, things have been tuned significantly.
Before owning a 5K iMac, my testing largely focused on the area of performance that was most labourious. Importing and exporting. Sure, I could set things running and walk away, but I’m lazy by default and walking away often leads to doing something utterly unproductive. Also, during the height of wedding season, there are days (generally Thursdays) where I want to do LOTS of tasks simultaneously and the speed at which I can complete those tasks really matters. Often I want to export, edit, build slideshows and do other general computer tasks all in parallel. A setup that cuts through the workload faster is gold dust on days like that. However, in the cloud of rumour that proceeded the arrival of Lightroom CC, the talk generally suggested that the develop module was where most of the performance improvements would occur. My experience and testing thus far – using Lightroom CC over the past week or so – is that there are useful gains to be had in both areas, import/export and during editing itself.
The Lightroom Test Mule benchmark, which I developed a few years back, has gathered quite a bit of data over the months. It’s not a huge dataset by any means, but it’s certainly useful. I’ve updated the results spreadsheet with my latest findings on Lightroom CC performance. If you’d like to run the tests yourself, please do. The Test Mule zip containing the test files and instructions can be downloaded here and I’d like to extend my particular thanks to Matthias Ecker for kindly providing the space to host the zip file. If you run the tests please do follow the instructions carefully and if you’d like to email the results in to me, please do and I’ll add them to the spreadsheet.
 So, lets get into some findings. Here’s the one-liner, Lightroom CC Performance is impressive.
Crop Performance
In a word, solved. As the above video shows there is none of the infuriating sporadic pausing on entering or exiting the crop tool that was so problematic in Lightroom 5.6. I never encountered this problem when on a regular DPI screen so can only assume it was extremely taxing for the CPU when attempting to transform images on the 15 megapixels of a 5K display. Clearly, in Lightroom CC, better code, effectively leveraging the considerable available hardware – my machine is a 4GHz i7, 24GB RAM, AMD Radeon R9 M295X 4096 MB, Fusion Drive – has rectified the issue. There is a brief moment of pixellation after the edit is applied (but it is very brief), the crop tool itself is smooth during use and the system does not lock up while it re-renders the finished image. I am addicted to my Retina display and not willing to part with it and I crop a lot of my images; given those factors, this improvement alone makes Lightroom CC worth the upgrade.
Lightroom CC Performance – Import/Export and the Test Mule Benchmark
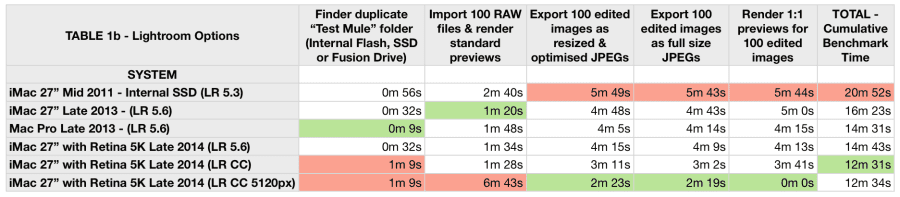
This is possibly the most surprising part of Lightroom CC for me. While fixing the crop tool was requirement number one, my expectations for Import/Export performance – the tasks largely addressed by the Test Mule benchmark – were for essentially no gains whatsoever. I was therefore quite pleased when the results showed modest improvements. Same hardware, same tests, different results. Thanks entirely to better software unlocking more performance from the system. The table below lists results on my 5K iMac and a selection of other machines. The 5K iMac has three separate sets of results as the benchmark was performed under a number of scenarios:
- Under Lightroom 5.6.
- Under Lightroom CC using the preview size the benchmark calls for (2048px)
- Under Lightroom CC using the new ‘Auto’ setting which renders standard previews at a size suitable for the display in use. On the 5K iMac this is the horizontal resolution of the screen, 5120px. This setting is new in Lightroom CC and while there is a tradeoff, it’s potentially one worth making.
There are a few immediate takeaways:
- Looking at the first test column, the finder duplicate test has got significantly slower since I last ran it on the then-new machine back in October 2014. This is a test performed outside Lightroom and has nothing to do with Lightroom itself but it shows that over time, as space is used up, Apple’s Fusion Drive becomes somewhat slower. It seems probable that the duplicate test occurred on the slower HDD component of the drive.
- Clearly Lightroom CC is using the available hardware far more efficiently than its predecessor. All the Lightroom specific tests ran faster (when using 2048px previews) than under 5.6. Exporting images was over a minute faster.
- The quickest import test was posted by the Late 2013 iMac. This seems slightly erroneous in retrospect and I’d love to go back and retest. However this was an SSD machine and it’s possible that the mixture of fast processor and fast storage are helping it pip the 5K iMac in this area. I’d love to see results from a 5K iMac with an SSD running LR CC. If you have this setup, grab the Test Mule, run the benchmarks and email me your results!
- Looking at the ‘Cumulative Benchmark’ time, even with the ‘Finder duplicate’ test being significantly slower, Lightroom CC smokes Lightroom 5.6 on the same hardware (by over 2 minutes) and beats the former champion, the Late 2013 Mac Pro, to the top spot.
- Changing Standard Preview size to ‘Auto (5120px)’ in Lightroom CC’s Catalog Settings menu is an interesting trade off. It takes much longer to render the previews on initial import but subsequent operations are greatly sped up. As the standard previews are so large, it doesn’t even need to build 1:1 Previews when requested. I need to explore this setting more. It’ll be interesting to see whether there is any noticeable difference in areas such as zoom speed when using this option over the 2048px setting.
- Regardless of which setting you choose for your Standard Preview size, Lightroom CC performance is significantly improved compared to Lightroom 5.6.
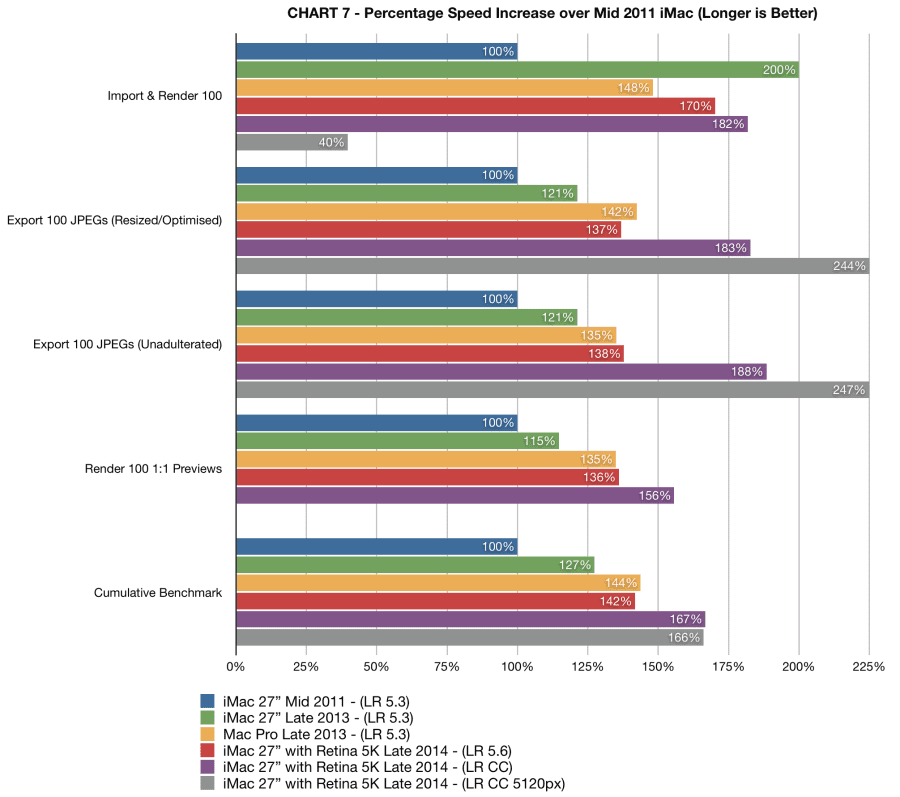
If we look at things from a percentage speed increase point of view, we can see that over the last few years a combination of more powerful hardware and improvements to Lightroom, most significantly in the latest CC release, have led to extremely worthwhile performance gains. Things simply don’t take as long as they once did. I’m sure the arrival of cameras like the Canon 5Ds are waiting in the wings to steal back the gains…
UPDATE – One of the staff members over at the Adobe Forums has posted some interesting insights into the role of the GPU in Lightroom CC. It’s worth a read and can be found here.
New Features
For many, speed is probably the single biggest feature in Lightroom CC, but alongside the go-faster stripes there are some great new ‘features’ in the regular sense of the word:
- Panorama Merge
- HDR Merge
- Facial Recognition
- Gradient Brushing
Where previously things like a panoramics or HDR would require a roundtrip to Photoshop (or similar software) and the forfeiting of a true raw file for, at best, a 16-bit TIFF, in Lightroom CC these merges can now occur entirely in-app and instead result in .dng raw files with all the dynamic range and white balance benefits that comes with that. I rarely shoot HDR images and so haven’t had the chance to test this yet, but Panorama merge is a godsend and in my limited testing works extremely well.
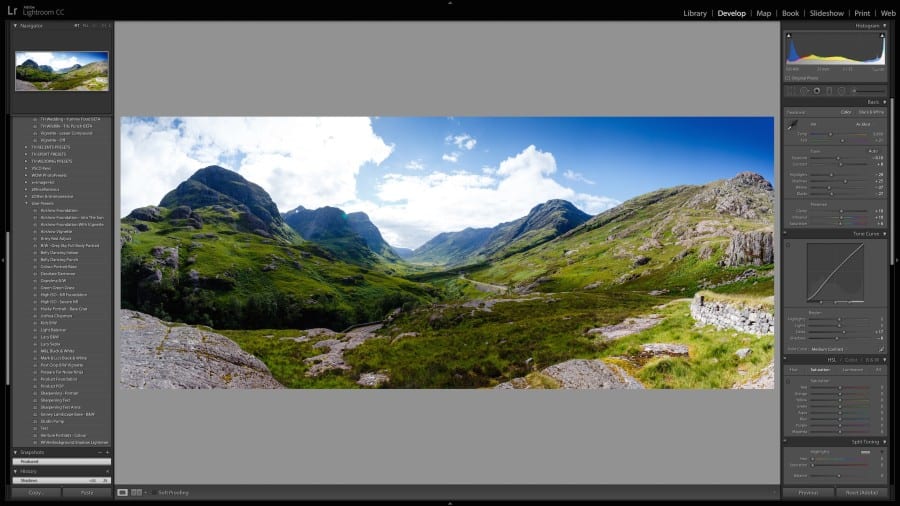
It’s a much more seamless experience; one that saves time and is functionally more powerful.
The facial recognition is also going to be great for me as a wedding photographer. Finding clients who pop up at other weddings and cross referencing things years later should be much easier. Also, it’ll make it much easier to find friends and family that are shot sporadically on a great range of gear in a variety of settings. My personal work often doesn’t receive the same archival love as my commissions so I’m all for anything that helps me find images of the people I care about! I’ve not got into the facial recognition feature in much detail yet but it seems to work perfectly well. From what I can make out it’s best to tackle things on a folder or collection basis, bit by bit rather than trying to deal with the whole library en masse. I’ve recently been sorting out my legacy Apple Photos library, which I largely use for iPhone shots, and it’ll be interesting to compare the face recognition in the consumer-oriented Photos and more pro-centric Adobe Lightroom.
The two other features which are slightly less glitzy but are equally useful are the addition of brushable gradients, perfect for horizon lines that don’t follow convenient straight lines, and the new ability to drag brush areas. I dodge and burn a fair bit and when things move slightly from one frame to the next in a sequence of similar images I used to find myself rebrushing an area to get the adjustment right where I need it. Now, more often than not, I’ll be able to simply copy and paste the brushes from one image to the next and then drag adjustments back into the correct spot if elements in the photograph have moved. These are unglamorous changes but ones that will see real-world use and save real-world time.
Slideshow, Proofing and Other Findings
The Slideshow Module had become pretty defunct due to one issue and another in Lightroom 5.6. These issues are all solved with Lightroom CC. The jerkiness that made slideshows unwatchable on a 5K display is gone. I don’t know for certain what wizardry is at play, but I imagine the GPU is to thank. Another indescribably annoying bug has also been fixed. In Lightroom 5 (or possibly 4, I forget) the Slideshow Module lost the ability to navigate backwards and forwards in a slideshow using the arrow keys. This was maddening as it was such a useful function when showing clients pictures or reviewing edits. Basic stuff I know, but Adobe giveth and Adobe taketh away!
Soft Proofing is also dramatically improved. On the 5K iMac under Lightroom 5.6 adjustments rendered so painfully slowly that it was impossible to get any sense, visually, of how things were changing. It meant flicking between Snapshots was the only way of effectively viewing changes and even that was hit and miss. Here, once again, CC corrects the problem. Everything is responsive again. Responsiveness is, across the board, undoubtedly the biggest boon in Lightroom CC.
Responsiveness is, across the board, undoubtedly the biggest boon in Lightroom CC.
The develop module never really felt slow to me in Lightroom 5.6 – aside from the issues with cropping – but nonetheless it is clearly much smoother in CC. I edit mostly using a gamepad, but the smoothness is particularly apparent when dragging sliders with the mouse. Adjustments feel very ‘connected’. A twitch of the mouse is instantly reflected in the image. Pulling exposure down for example feels more like twisting a Variable-ND than some sort of computer based effect. Buttery. It’s pretty sad to appreciate such a thing but when you spent many hours editing there’s very real enjoyment to be gleaned!
I did encounter a small bug. The good news is it may have been resolved already by an OS update. As I mentioned, I crop a lot and I edit using a gamepad and mouse. I love the Lights-Out Mode which dims down the rest of the screen and I use this a heck of a lot, especially during cropping, as it takes away the distractions and allows me to focus on the edit in more detail. I have actually created a macro so that entering cropping automatically invokes Lights-Out Mode. When I initially downloaded Lightroom CC I was running OS X Yosemite 10.10.2. I have subsequently upgraded to 10.10.3 and am now unable to reproduce this issue. However on initial use, regardless of how Lights-Out was accessed in Lightroom CC, I discovered that, after using the crop tool, invoking Lights-Out would dim the entire screen rather than just the panels and sidebars. It could be resolved by hitting the ‘L’ key again to exit Lights-Out and then zooming in on the image – after which things went back to normal – but it was repeatable and annoying. I mentioned it on Twitter and a nice chap called Rikkflohr was able to reproduce it. However, like I say, since upgrading to 10.10.3 I haven’t encountered the problem. Here’s a video showing the issue as it presented under 10.10.2.
UPDATE – A photographer friend of mine, Mark Harris, has reported that he too is encountering the Lights-Out bug. Mark, however is running under OS X 10.10.3 so it seems this issue, while sporadic, is not squashed by the latest version of OS X.
Conclusion
Lightroom CC is an excellent update from my point of view. It corrects nearly all of the things I’ve had problems with while speeding up the app considerably and adding some useful new features. It’s one of those releases that has seriously shortened my “I hope they’ll fix/add that” list and that is undeniably a good thing. When we’re getting to the point that I can’t envisage much more I’d like to improve, then things are certainly going in the right direction. I think I’d like to see improved rendering for Fuji X-Trans sensors, but the current situation is fine and unproblematic. Aside from that, I’ll have to have a think! Would I recommend Lightroom 6/Lightroom CC? Very much so. If you use Lightroom regularly it’s a worthwhile update.
Thanks for reading. If you enjoyed the article, come and say hi over on Twitter. I’m @tonyhartphoto.
* I decided a few months ago to move to Adobe Creative Cloud, hence why I am testing the CC edition of the program and not the standalone app. I am not a huge fan of the subscription model but photography, and these apps, are essential to my business so I decided to get on the bandwagon. Thus far I have not been had cause to regret my decision.


I wonder if the new LR 6 will have the same improvement at CC?
I wrote an article about that here.
It seems that Lr just doesn’t handle the high PPI display well.
One way to drastically improve overall Lr performance and especially develop module performance on the Retina iMac is to set OS X to run Lr in “Low Resolution” mode. The drawback is that the text in the Lr gets a little pixelated, but performance increase is worth it for me. Follow the instructions here to set applications to open in low res: https://support.apple.com/en-us/HT202471
Tony, my biggest concern is the slider delay in the developer tool. When I am editing a photo I want the slider to photo adjustment to be as close to seamless as possible, without any delay. Does the iMac 5k and new lightroom accomplish this? Or are there still fairly significant delays?
Not for me. The changes are pretty instantaneous. I certainly have the feedback I feel I need to be able to use the sliders effectively. That said, the majority of the time I make my adjustments using keystrokes to add/reduce adjustments and done that way the changes are nigh on instantaneous.
Thanks Tony Hart for this interesting article! I’ve been hesitating for a long time now which direction to go on hardware level (pc or mac, mac book pro or imac,…), visited couple of shops (pc and mac), but this article gives me that little push I needed to take my decision to go for the imac 5k retina! And upgrade from Lightroom 6 to CC of course ?
What did you find out about the Auto (5120px) setting? I’m seeing it on my new 4k screen.
Hi Sean. Sorry for the slow reply! The Auto setting – from what I can make out – essentially just assesses your screen resolution and creates previews that are sufficiently large for your resolution. It takes a while to build them but it avoids the possible user error of a person with a huge screen building standard previews and those standard previews being way too small for a big screen.